I've pushed my slides from the presentation I've given at useR! a few minutes ago here
Tag - jedit
Tuesday, June 2 2009
Better completion popups
By romain francois on Tuesday, June 2 2009, 11:03
I've now updated the completion popups used in the advanced editor plugin to get a better display of the available information
For completion items that are related to functions with a help page, we now get this popup

When completing arguments of functions, the text of the argument is grabbed from the help page (if available), and displayed as such:

For functions that do not have help page, such as functions in the global environment, a deparse of the function is displayed

It is probably better to build the plugin from source, but otherwise I have posted a build here
I am currently working on ways to bring this completion mechanism to the console as well
Monday, March 16 2009
A better jedit edit mode for R
By romain francois on Monday, March 16 2009, 08:35
I have spend a bit of time over the week end working with the jedit edit mode file for R code. That is the file that guides jedit on how to syntax highlight R code. The previous one I was using was based on the idea "let's put all the names of all the functions in standard R packages as keywords", although "it works", it is not a very good idea since it makes the edit mode huge and consequently must have some effect on jedit's performance when painting R code
The new mode file can be found on the biocep-editor project on r-forge
Here are some of the choices I have made
- function calls are highlighted with type FUNCTION. A function call is a name followed by a round bracket
- Core language constructs are highlighted with type KEYWORD1: (for, function, if, else, ifelse, in, repeat, return, switch, while, break, next) I have also added these to that list: (expression, quote, parse, deparse, substitute, get, getAnywhere, assign, exists, expression, bquote, typeof, mode, eval, evalq, with).
- Debugging related functions are highlighted with type KEYWORD2: browser, debug, trace, traceback, recover, undebug, isdebugged, bp, mtrace
- Error handling functions are highlighted using KEYWORD3: try, tryCatch, withRestarts, withCallingHandlers, stop, stopifnot, geterrmessage, warning, signalCondition, simpleCondition, simpleError, simpleWarning, simpleMessage, conditionCall, conditionMessage, computeRestarts, findRestart, invokeRestart, invokeRestartInteractively, isRestart, restartDescription, restartFormals, .signalSimpleWarning, .handleSimpleError
- Object Oriented related functions (S3 and S4) are using type KEYWORD4: class, inherits, setClass, representation, structure, methods, setIs, slot, new, setMethod, validObject, setValidity, getValidity, initialize, setOldClass, callNextMethod, NextMethod, UseMethod, getS3method
- Constants are using type LITERAL2: NULL, Inf, NULL, NA, NaN, T, TRUE, F, FALSE, pi, NA_character_, NA_complex_, NA_integer_, NA_real_
- Apply functions are using LITERAL4: lapply, sapply, by, mapply, tapply, apply, replicate, aggregate. I have also added some functions from the packages reshape and plyr to that list
- Support for R4X by delegating to the R4X mode (mainly XML) between strings "'##((xml" and "'##xml))"
- Support for Roxygen comment, inspired from the way javadoc comments are treated in the java mode
Tuesday, February 24 2009
Mode specific perspectives for the biocep workbench
By romain francois on Tuesday, February 24 2009, 21:28
Following on this previous post, here is how to set up jedit in the power editor to use mode specific perspectives, so that when you leave a file of a given mode (say R), the current perspective is saved, and when you load a file of a given mode (say sweave), the recorded perspective is used (if it exists)
You first need to start the workbench, with a recent version of the power editor plugin (svn revision >220)

Then load the editor plugin. Plugin > Editor > Power Editor

Finally, you need to tell jedit that you want it to manage saving and loading perspectives automatically based on the mode of the file being edited. You can do that using the jedit menu jEdit > Utilities > Global Options, ... The following dialog is displayed, click the two checkboxes on top.

That's it. You can also save a perspective by selecting jEdit > View > Docking > Save Docking Layout ...
Sunday, February 8 2009
Playing with QtJambi and Jedit
By romain francois on Sunday, February 8 2009, 19:37
Qt Jambi
I've been looking at excuses to learn Qt for some time now, but could not really justify to myself going back to C++, but now with jambi, you can write Qt programs in java. More importantly, with the Qt Jambi to Awt bridge, you can melt swing components in Qt windows and Qt widgets in swing components. Here is a picture of some swing components in a QWidget

and another one with some Qt components in a swing frame
 See this code snippet for how it is easy to do:
12         QGridLayout layout = new QGridLayout(this);
13
14         // A few Qt widgets
15         layout.addWidget(new QLabel("First name:"), 0, 0);
16         layout.addWidget(new QLineEdit(), 0, 1);
17         layout.addWidget(new QLabel("Last name:"), 1, 0);
18         layout.addWidget(new QLineEdit(), 1, 1);
19
20         // The AWT part of the GUI
21         {
22             JPanel panel = new JPanel();
23
24             panel.setLayout(new GridLayout(1, 2));
25
26             panel.add(new JLabel("Social security number:"));
27             panel.add(new JTextField());
28
29             // Add the AWT panel to Qt's layout
30             layout.addWidget(new QComponentHost(panel), 2, 0, 1, 2);
31         }
32
beyond hello world
So I wanted to go beyond the hello world level, and try to integrate jedit in a Qt window. If it works, this could lead to interesting things such as distributing jedit dockable windows through Qt system QtDockWidget which should be easy based on the new abstract docking window manager service in jedit, or using Qt widgets to extend jedit, ...
I managed to embed jedit in a Qt window, although I had to trick jedit to not build a JFrame when a view is created, I've used the same trick as in biocep workbench, which is writing a small patch to the jEdit class so that the view (which is a JFrame) is never set to visible, and its content pane borrowed by some other component, in that case, a Qt component. Here is how everything looks like:
$ tree
.
|-- build.properties
|-- build.xml
|-- jambidocking
|   |-- data
|   |   |-- JambiDockingPlugin.props
|   |   |-- actions.xml
|   |   `-- services.xml
|   `-- src
|       `-- JambiDocking
|           |-- JambiDockingDockingLayout.java
|           |-- JambiDockingWindowManager.java
|           |-- Plugin.java
|           `-- Provider.java
|-- src
|   |-- com
|   |   `-- addictedtor
|   |       `-- jambijedit
|   |           `-- JambiJedit.java
|   `-- org
|       `-- gjt
|           `-- sp
|               `-- jedit
|                   `-- jEdit.java
`-- src_qtjambiawtbridge
    `-- com
        `-- trolltech
            `-- research
                `-- qtjambiawtbridge
                    |-- QComponentHost.java
                    |-- QWidgetHost.java
                    |-- QWidgetWrapper.java
                    |-- QtJambiAwtBridge.java
                    |-- RedirectContainer.java
                    |-- examples
                    |   |-- AwtInQt.java
                    |   `-- QtInAwt.java
                    `-- generated
                        |-- QComponentHostNative.java
                        |-- QWidgetHostNative.java
                        `-- QtJambi_LibraryInitializer.java

19 directories, 21 files
Apart from the code of the Qt Jambi to Awt bridge, there is the patched jEdit.java, the JambiJedit.java file which basically creates a Qt main window and sets jedit as its central widget, and the jambidocking directory which contains the start of an implementation of jedit's shiny new DockableWindowManager system (more on that later)

The good news is that it works, the bad news is that it sort of works
Bad things start to happen when I tried to implement the DockableWindowManager system, here is the kind of messages I get, I suppose the issue is that jedit uses threading quite a lot and Qt is not happy about it
     [java] Exception in thread "main" 7:25:23 PM [main] [error] main: QObject used from outside its own thread, object=com::trolltech::research::qtjambiawtbridge::QComponentHost(0xa305370) , objectThread=Thread[AWT-EventQueue-0,6,main], currentThread=Thread[main,5,main]
     [java] 7:25:23 PM [main] [error] main:  at com.trolltech.qt.GeneratorUtilities.threadCheck(GeneratorUtilities.java:56)
     [java] 7:25:23 PM [main] [error] main:  at com.trolltech.research.qtjambiawtbridge.generated.QComponentHostNative.event(QComponentHostNative.java:37)
     [java] 7:25:23 PM [main] [error] main:  at com.trolltech.research.qtjambiawtbridge.QComponentHost.event(QComponentHost.java:35)
     [java] 7:25:23 PM [main] [error] main:  at com.trolltech.qt.gui.QApplication.exec(Native Method)
     [java] 7:25:23 PM [main] [error] main:  at com.addictedtor.jambijedit.JambiJedit.main(Unknown Source)
     [java] QPixmap: It is not safe to use pixmaps outside the GUI thread
     [java] QPixmap: It is not safe to use pixmaps outside the GUI thread
     [java] QPixmap: It is not safe to use pixmaps outside the GUI thread
     [java] QPixmap: It is not safe to use pixmaps outside the GUI thread
     [java] QPixmap: It is not safe to use pixmaps outside the GUI thread
     [java] QPixmap: It is not safe to use pixmaps outside the GUI thread
Anyway, I zipped it up here in case someone else wants to have a go. It is not quite there yet but at least now I have my excuse to learn Qt, which was the original point ...
Saturday, February 7 2009
Nested 0.1 on jedit plugin central
By romain francois on Saturday, February 7 2009, 10:34
Nested has been released on jedit plugin central, you can now install it via jedit's plugin manager

In short, nested is a jedit plugin that lets you see when you edit files with nested languages, such as for example XML inside R (see this post to find out what the code is about) :

Note, you need to install my R edit mode for jedit to recognize the xml within R.
21     <!-- deal with R4X inline XML -->
22     <SPAN DELEGATE="xml::MAIN" >
23       <BEGIN>'##((xml</BEGIN>
24       <END>'##xml))</END>
25     </SPAN>
26
Monday, February 2 2009
Nested: support for editing multiple languages files in jedit
By romain francois on Monday, February 2 2009, 08:43
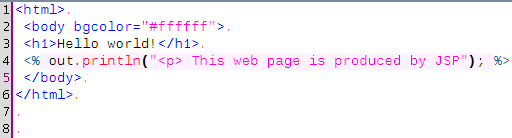
jedit usually makes a good job of editing files with various languages in it, for example jsp files contain some java code, sweave files contain some R code, brew templates contain R code, R code might contain XML code (if you use the R4X package, but we'll get to this one some other time). Unfortunately, because jedit uses the same color styles for all languages, you don't get so much of a visual aid to tell you that you switched languages, enters Nested
Nested is a simple jedit plugin that paints the background of a code chunk differently if this code is not coming from the same mode as the mode of the buffer, and the color is left to the user's choice. Here is an example with some java code within a JSP file, the pink background around the java statement comes from the Nested plugin.
The colours are controlled by a file residing on the plugin directory that looks like this :
html,css,#eeeeee
jaxx,java,#ccff99
jaxx,xml,#ffffff
jsp,java,#fff2ff
but you can also use the Nested dockable window to control things

Java code will appear in pink inside a jsp file, java code will appear green inside jaxx files, ... and you can click on the colour if you want to change it to something else
When you open a file that contains sub-languages, an entry will automatically be inserted in the settings if it does not exist yet, in that case, the colour used is the same as the background color of the view, so that by default nothing changes.
Friday, January 30 2009
jaxx mode for jedit
By romain francois on Friday, January 30 2009, 16:28
jaxx lets you write Swing user interfaces using XML tags instead of raw java code.
I've written a quick jedit mode file for jaxx so that it is a bit nicer to write jaxx code in jedit. Basically, it write paint code inside
script tags as java code and code inside style tags as CSS. It would need a bit of work to deal with data binding and the special jaxx css, but it's a start.
<?xml version="1.0"?>
<!DOCTYPE MODE SYSTEM "xmode.dtd">
<MODE>
<RULES IGNORE_CASE="FALSE">
<SPAN_REGEXP MATCH_TYPE="MARKUP"
DELEGATE="java::MAIN" HASH_CHAR="<">
<BEGIN><script></BEGIN>
<END></script></END>
</SPAN_REGEXP>
<SPAN_REGEXP MATCH_TYPE="MARKUP"
DELEGATE="css::MAIN" HASH_CHAR="<">
<BEGIN><style></BEGIN>
<END></style></END>
</SPAN_REGEXP>
<IMPORT DELEGATE="xml::MAIN" />
</RULES>
</MODE>
Don't forget to add this line to you catalog file:
<MODE NAME="jaxx" FILE="jaxx.xml" FILE_NAME_GLOB="*.jaxx" />
Thursday, January 22 2009
Code2html speaks Latex too
By romain francois on Thursday, January 22 2009, 11:04
For highlighting code inside latex documents there are several options:
This might be a judgement call, but I don't find the latex output of listings or highlight to be visually pleasing enough, but maybe it is just a lack of understanding on how to customize them. Anyway, jedit has the Code2HTML plugin which does a good job of translating the buffer being edited in jedit into html markup, preserving pretty much everything that appear on the jedit text area. This takes advantage of jedit mode files which offers a great deal of flexibility, including nested languages, such as javascript/php, or R and Sweave if you have the right mode files.
So I had a look into the code of the Code2HTML plugin which is simple enough, and have basically done a big And a screenshot of the pdf file
 Here are the relevant files if you want to try it out:
- the listings package (somehow supported by the R package SweaveListingUtils
- Using highlight. I am using it in the graph gallery for example
- There are probably other ways ...
This might be a judgement call, but I don't find the latex output of listings or highlight to be visually pleasing enough, but maybe it is just a lack of understanding on how to customize them. Anyway, jedit has the Code2HTML plugin which does a good job of translating the buffer being edited in jedit into html markup, preserving pretty much everything that appear on the jedit text area. This takes advantage of jedit mode files which offers a great deal of flexibility, including nested languages, such as javascript/php, or R and Sweave if you have the right mode files.
So I had a look into the code of the Code2HTML plugin which is simple enough, and have basically done a big
s/html/latex/g to support latex output (I realize this is not the best option and I should probably abstract things out so that it would be easier to add new formats: ansi, svg, ...) but it does the trick for now.
Here is a screenshot of an example file edited in jedit:
And a screenshot of the pdf file
Here are the relevant files if you want to try it out:
- The modified source of Code2HTML
- The actual jar file
- An example R file
- ... once translated into latex markup
- ... once compile with pdflatex
- do something about the gutter
- figure out how to invoke that from the command line
- write a sweave driver that would call it so that R code appears formatted in sweave documents
Sunday, January 18 2009
Structure Matcher for brackets in R scripts (2)
By romain francois on Sunday, January 18 2009, 20:00
A few coding hours in the train later, I've added new features to the structure matcher for R scripts. Basically I've been working to improve the matching of closing curly brackets in particular cases. This is how it proceeds: when you close a curly bracket, it looks for the corresponding opening bracket (thanks to the TextUtilities class), then looks if there is a closing round bracket just before, finds the matching opening round bracket, identifies which word is before. Then
- if this word is one of if, for, while, repeat or function the macth is considered to start from the word up to the closing curly bracket
- Otherwise, the match is just the closing curly bracket as usual
... but it is probably better to show some screenshots to get a better idea:


Wednesday, January 14 2009
Structure Matcher for brackets in R scripts
By romain francois on Wednesday, January 14 2009, 11:40
It is often useful when you close a bracket to know which bracket is the corresponding opening bracket, for this jedit has the StructureMatcher interface and the default implementation gives you this information, by surrounding the opening bracket when you type its associated closing bracket.
On the other hand, the XML plugin gives you a more useful information when closing an XML tag. Let's see it in action with this simple XML file from the w3c

On the left, the caret is within the </note> closing tag and so the entire opening <note> tag is being highlighted. Similarly, on the right, the caret is within the opening <heading> tag and consequently the closing </heading> gets highlighted. This is particularly useful when editing xml documents.
So the idea was to have the same sort of behaviour for R scripts. Here's a start, but I also plan to do something with the curly brackets to deal with for loops, function definitions and various apply calls, ... (see that post)


Friday, January 9 2009
Code Completion for R scripts
By romain francois on Friday, January 9 2009, 15:31
Standard Completion
The power editor supports completion of R code by relying on the CompletePlus function in the svMisc package. This function uses the completion engine that comes with R (formerly implemented in the rcompgen package and incorporated in utils in recent versions of R), and looks in documentation files for additional information related to each finding, for example when completing "rnorm( ", the CompletePlus function looks into the help page for rnorm and retrieves the description of each of the arguments :
R> require( svMisc )
Loading required package: svMisc
R> CompletePlus( "rnorm(" )
     [,1]      [,2]
[1,] "n = "    "rnorm"
[2,] "mean = " "rnorm"
[3,] "sd = "   "rnorm"
     [,3]
[1,] "number of observations. If 'length(n) > 1', the length is taken to be the number required."
[2,] "vector of means."
[3,] "vector of standard deviations."
The power editor plugin uses this information to display completion popups:


Completion of Colors
In special cases, instead of argument or function names, the engine will complete for colours using the current R palette :

or names of colors if you started to type a quote character

here the user started to type gre so the completion engine looks for colors having a name that matches the pattern gre. This is basically obtained as follows:
> head( grep( "gre", colors(), value = T ) )
[1] "darkgreen"       "darkgrey"        "darkolivegreen"  "darkolivegreen1"
[5] "darkolivegreen2" "darkolivegreen3"
Line Type completion
Usually the lty argument is associated with a line type, the completion engine suggests the basic line types as documented in ?par

Plot Character Completion
Same with the pch argument and the plotting character.

Monday, January 5 2009
Install the power editor plugin
By romain francois on Monday, January 5 2009, 15:58
Dependencies
biocep.jar
You need to have the workbench installed on your machine, meaning you need the biocep.jar file to be somewhere you know. Instructions on how to get it and install it can be found on the biocep page. Since the power editor follows the developpment of the workbench closely, I would recommend to build the biocep.jar from source, which can be done by retrieveing the biocep project from r-forge :$ svn checkout svn://svn.r-forge.r-project.org/svnroot/biocepFor this to work you need java (>= 1.5) and ant installed. This should create a file biocep.jar that you can copy wherever you like. On my linux machine, I usually put a copy at "/opt/biocep/biocep.jar"
$ cd biocep
$ ant distrib
java and ant
the plugin is written in java, so you need a JDK (at least 1.5) installed and also ant.R packages
The svTools package (from the sciviews) project contains most of the R side code needed by the plugin. At the time of writing, this package is not on CRAN, so you need to install it (and its dependencies) from r-forge:- svTools :
install.packages("svTools",repos="http://R-Forge.R-project.org") - operators:
install.packages("operators",repos="http://R-Forge.R-project.org") - svMisc:
install.packages("svMisc",repos="http://R-Forge.R-project.org")
Retrieve the project from r-forge
You can checkout the biocep-editor project from r-forge by :$ svn checkout svn://svn.r-forge.r-project.org/svnroot/biocep-editorOnce the project is retrieved, you need to edit the file build.properties.sample and rename it build.properties.
$ cd biocep-editor
The most important properties to edit are "biocep.dir" and "install.dir" :
- biocep.dir is the name of the directory where the biocep.jar file is located (/opt/biocep in my settings)
- install.dir is the name of the directory where the Editor plugin will be installed, it will be something like "C:\Documents and Settings\romain\RWorkbench\plugins" on windows and something like "/home/romain/RWorkbench/plugins/Editor" on linux
Two "modes" of installation
Dependent mode
The power editor plugin mainly consists of jedit (and jedit plugins) slightly patched so that it can be used as a view of the workbench instead of a main application. The plugin has been developped so that it can coexist with another installed copy of jedit and share the same set of plugins, this is the dependent mode of install because it depends on an installed copy of jedit. Note however that it will only work with versions of jedit greater or equal to 4.3pre16.The ant targets "installDependent" and "zipDependent" can be used to install or create a zip of the plugin. Since with this mode, we are going to depend on another installed version of jedit, we need to let the plugin know about this version, this is achieved by modifying the file "jedit.properties" with appropriate values of the two properties :
- jedit.home: this is the directory where jedit is installed. A "jedit.jar" file must live in this directory along with directories such as modes and jars. I usually install jedit in the directory "/opt/jedit" on my linux machines and under "C:\Program Files\jEdit" on my windows machines.
- jedit.settings: this is the settings directory of jedit, containing jedit plugins (in the jars directory), user mode files (in the modes) directory, ... on my linux machines, it usually is "/home/romain/.jedit" and on my windows machines "C:\Documents and Settings\romain\.jedit"
$ ant installDependent
Standalone mode
However, you do not need to have jedit installed for the plugin to work at all, if you do not have jedit installed otherwise, you will use the standalone mode of installation of the plugin. In this mode, you do not need to edit the jedit.properties file since a dummy one will be generated by ant, simply build the plugin using the "installStandalone" target:ant installStandalone
Check that the plugin is installed
After succesful installation, the workbench should contain the menu item "Plugins > Editor > Power Editor"
Wednesday, December 31 2008
Edit Sweave files with the workbench
By romain francois on Wednesday, December 31 2008, 17:32
Edit Sweave Files with the Workbench
Sweave is a very useful combination of LaTeX and R together in one document. You can find more information about sweave by visiting its homepage or by simply typing ?Sweave at your R command line.This post demonstrates some of the features of the Power Editor plugin for the biocep workbench when editing Sweave files, we will see other features in subsequent posts.
The LaTeXTools plugin for jedit gave a good starting point for Sweave integration as most of the parsing of LaTeX syntax is directly borrowed from it, however the plugin could not directly cope with the mixture of latex and R in the same document, so there is a small bit of coding around it to get things working. Also the sidekick tree for latex gives a too restrictive set of icons for the sections of the file, so some coding was needed to get a nice R icon to represent a sweave code chunk.
Here is a screenshot of the workbench when editing a sweave file, this example is the grid vignette, which you may find by typing :
R> vignette( "grid", package = "grid")$file

You can see the sidekick view on the right showing a browsable outline of the document. The editor and the sidekick view are synchronized so when you click on a node of the tree, the editor will scroll to the appropriate location and when you move to some other part of the document, the tree will update to show the location being edited.

The Power Editor plugin also allows to visually identify documentation and code parts of the document as you can see in the following screenshot where Sweave code chunks are being highlighted with a light blue background.

Requirements
To get the features documented here, you need both updated versions of biocep and the Power Editor Plugin (at least revision 194). I will do an other post about how to install these things.You also need R and Sweave mode files (I still need to find a way to embed them in the plugin) saved in your jedit settings directory with the following lines in your catalog file :
<MODE NAME="R"    FILE="r.xml"
  FILE_NAME_GLOB="*.R"
  FIRST_LINE_GLOB="#!/*{R,Rscript}" />
<MODE NAME="sweave"
  FILE="sweave.xml"
  FILE_NAME_GLOB="*.{R,S}nw" />
Coming Next
It would be nice to :- allow preview of graphics when
fig=TRUEis set, I need to understand some of the packages providing cache feature for Sweave have R completion when inside the code chunk, see this post- completion of the options used by the sweave driver
- actions to weave and tangle the current file
- jump between sweave code chunks
- integrate this as a view
- support the html flavour of sweave