Romain Francois, Professional R Enthusiast

To content | To menu | To search

Friday, February 6 2009

Tag cloud for the R Graph Gallery

This post has a following goals: announcing the graph gallery has gained a tag cloud, and showing how it is done.

Screenshot.png

The cloud is a simple tag cloud of the words in titles of graphics that are included in the gallery. For this purpose, I am using an XML dump of the main table of the gallery database, here is for example the information for graph 12.

226     <graph>
227         <id>12</id>
228         <titre>Conditionning plots</titre>
229         <titre_fr>graphique conditionnel</titre_fr>
230         <comments>Conditioning plots</comments>
231         <comments_fr>graphique conditionnel</comments_fr>
232         <demo>graphics</demo>
233         <notemoy>0.56769596199524</notemoy>
234         <nbNote>421</nbNote>
235         <nbKeywords>0</nbKeywords>
236         <boolForum>0</boolForum>
237         <px_w>500</px_w>
238         <px_h>400</px_h>
239     </graph>
240     <graph>
We are interested in the tag titre of each tag graph. That is something straightforward to get with the R4X package (I will do a post specifically on R4X soon).
   1 x <- xmlTreeParse( "/tmp/rgraphgallery.xml" )$doc$children[[1]]
   2 titles <- x["graph/titre/#"] 
Next, we want to extract words of the titles, we need to be careful about removing &br; tags that appear in some of the titles and also remove any character that is not a letter or a space, and then seperate by spaces. For that, we will use the operators package like this :
4 words <- gsub( "<br>", " ", titles ) 
5 words <- words %-~% "[^[:alpha:][:space:]]" %/~% "[[:space:]]"
Next, we convert eveything to lower case, and extract the 100 most used words:
7 words <- casefold( words )
8 w100 <- tail( sort( table( words ) ), 100 )
9 
and finally generate the (fairly simple) html code:
10 w100 <- w100[ order( names( w100 ) ) ]
11 html <- sprintf( '
12 <a href="search.php?engine=RGG&q=%s">
13     <span style="font-size:%dpt">%s</span>
14 </a>
15 ', 
16     names(w100), 
17     round( 20*log(w100, base = 5) ), 
18     names(w100) )
19 cat( html, file = "cloud.html"  )
20 
and that's it. You can see it on the gallery frontpage Here is the full script:
   1 ### read the xml dump
   2 x <- xmlTreeParse( "rgraphgallery.xml" )$doc$children[[1]]
   3 
   4 ### extract the titles
   5 titles <- x["graph/titre/#"] 
   6 
   7 ### clean them up
   8 words <- gsub( "<br>", " ", titles ) 
   9 words <- words %-~% "[^[:alpha:][:space:]]" %/~% "[[:space:]]"
  10 
  11 ### get the 100 most used words
  12 words <- casefold( words )
  13 w100 <- tail( sort( table( words ) ), 100 )
  14 w100 <- w100[ order( names( w100 ) ) ]
  15 
  16 ### generate the html using sprintf
  17 html <- sprintf( '
  18 <a href="search.php?engine=RGG&q=%s">
  19     <span style="font-size:%dpt">%s</span>
  20 </a>
  21 ', 
  22     names(w100), 
  23     round( 20*log(w100, base = 5) ), 
  24     names(w100) )
  25 cat( html, file = "cloud.html"  )
  26 
  27 ### or using R4X again
  28 # - we need an enclosing tag for that
  29 # - note the &amp; instead of & to make the XML parser happy
  30 w <- names(w100)
  31 sizes <-  round( 20*log(w100, base = 5) )
  32 xhtml <- '##((xml
  33     <div id="cloud">
  34         <@i|100>
  35             <a href="search.php?q={ w[i] }&amp;engine=RGG">
  36                 <span style="font-size:{sizes[i]}pt" >{ w[i] }</span>
  37             </a>
  38         </@>
  39     </div>'##xml))
  40 html <- xml( xhtml )
  41 

Wednesday, February 4 2009

Graphic literacy improving? Let's try (RGG#150)

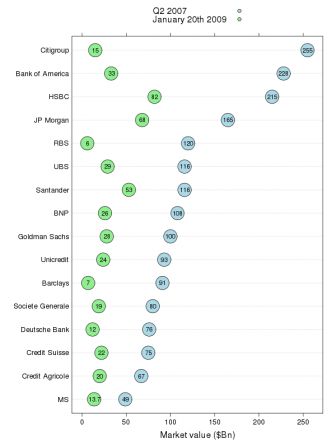
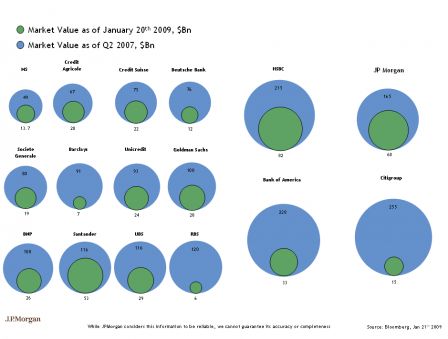
Here is a proposed alternative to this bubble inferno pointed out in the revolutions blog bubble.png ft.png and the R code behind it (here is the data). This is now item 150 in the graph gallery
   1 
   2 ### read the data
   3 d <- read.csv( "data.txt" )
   4 d$bank <- ordered( d$bank, levels = d$bank )
   5 
   6 ### load lattice and grid
   7 require( lattice )
   8 
   9 ### setup the key
  10 k <- simpleKey( c( "Q2 2007",  "January 20th 2009" ) )
  11 k$points$fill <- c("lightblue", "lightgreen")
  12 k$points$pch <- 21
  13 k$points$col <- "black"
  14 k$points$cex <- 1
  15 
  16 ### create the plot
  17 dotplot( bank ~ MV2007 + MV2009 , data = d, horiz = T, 
  18     par.settings = list( 
  19         superpose.symbol = list( 
  20             pch = 21, 
  21             fill = c( "lightblue", "lightgreen"), 
  22             cex = 4, 
  23             col = "black"  
  24         )
  25      ) , xlab = "Market value ($Bn)", key = k, 
  26      panel = function(x, y, ...){
  27        panel.dotplot( x, y, ... )
  28        grid.text( 
  29             unit( x, "native") , unit( y, "native") , 
  30             label = x, gp = gpar( cex = .7 ) )
  31      } ) 

Friday, January 23 2009

R wrapper in open turns

This is an attempt to create a wrapper for openturns using R. This is based on the wrapper template called wrapper_calling_shell_command available with openturns and somewhat inspired from the scilab example. Wrappers allow you to call an external program as the function through which you propagate uncertainty with openturns, so that you can write you function in the language you are familiar with (R here) but still take advantage of open turns. This was done in fedora with R and open turns installed (see this post for how to install open turns on a fedora 10 machine).
The first thing we need to do is to grab the template from the installed open turns.
$ mkdir ~/opwrappers
$ cp -fr /usr/local/share/openturns/WrapperTemplates/wrapper_calling_shell_command ~/opwrappers/rwrapper
$ cd ~/opwrappers/rwrapper/
$ ll
total 300
-rw-r--r-- 1 romain romain     27 2009-01-23 11:54 AUTHORS
-rwxr-xr-x 1 romain romain   1304 2009-01-23 11:54 bootstrap
-rw-r--r-- 1 romain romain 199260 2009-01-23 11:54 ChangeLog
-rw-r--r-- 1 romain romain    216 2009-01-23 11:54 code_C1.data
-rw-rw-r-- 1 romain romain   1594 2009-01-23 12:42 configure.ac
-rw-r--r-- 1 romain romain  18002 2009-01-23 11:54 COPYING
-rwxr-xr-x 1 romain romain   1794 2009-01-23 11:54 customize
-rw-r--r-- 1 romain romain   9498 2009-01-23 11:54 INSTALL
drwxr-xr-x 2 romain romain   4096 2009-01-23 11:54 m4
-rw-rw-r-- 1 romain romain    571 2009-01-23 12:42 Makefile.am
-rw-r--r-- 1 romain romain    447 2009-01-23 11:54 myCFunction.c
-rw-r--r-- 1 romain romain    455 2009-01-23 11:54 myCFunction.h
-rw-r--r-- 1 romain romain      0 2009-01-23 11:54 NEWS
-rw-r--r-- 1 romain romain    925 2009-01-23 11:54 README
-rwxrwxr-x 1 romain romain    435 2009-01-23 12:03 rwrapper.R
-rw-rw-r-- 1 romain romain   3722 2009-01-23 12:42 rwrapper.xml.in
-rw-rw-r-- 1 romain romain   1442 2009-01-23 12:42 test.py
-rw-rw-r-- 1 romain romain   9349 2009-01-23 12:42 wrapper.c
-rw-r--r-- 1 romain romain     27 2009-01-23 11:54 AUTHORS
The first thing to do is to customize the wrapper so that it is called rwrapper instead of the default wcode. This is achieved by the customize script:
$ ./customize rwrapper
The files myCFunction.* are useless and you can remove them at that point, we won't need the code_C1.c file either since we are going to write an R script instead.
$ rm myCFunction.* 
$ rm code_C1.c
$ ll
total 288
-rw-r--r-- 1 romain romain     27 2009-01-23 11:54 AUTHORS
-rwxr-xr-x 1 romain romain   1304 2009-01-23 11:54 bootstrap
-rw-r--r-- 1 romain romain 199260 2009-01-23 11:54 ChangeLog
-rw-r--r-- 1 romain romain    216 2009-01-23 11:54 code_C1.data
-rw-rw-r-- 1 romain romain   1594 2009-01-23 12:42 configure.ac
-rw-r--r-- 1 romain romain  18002 2009-01-23 11:54 COPYING
-rwxr-xr-x 1 romain romain   1794 2009-01-23 11:54 customize
-rw-r--r-- 1 romain romain   9498 2009-01-23 11:54 INSTALL
drwxr-xr-x 2 romain romain   4096 2009-01-23 11:54 m4
-rw-rw-r-- 1 romain romain    571 2009-01-23 12:42 Makefile.am
-rw-r--r-- 1 romain romain      0 2009-01-23 11:54 NEWS
-rw-r--r-- 1 romain romain    925 2009-01-23 11:54 README
-rwxrwxr-x 1 romain romain    435 2009-01-23 12:03 rwrapper.R
-rw-rw-r-- 1 romain romain   3722 2009-01-23 12:42 rwrapper.xml.in
-rw-rw-r-- 1 romain romain   1442 2009-01-23 12:42 test.py
-rw-rw-r-- 1 romain romain   9349 2009-01-23 12:42 wrapper.c
Next, we need to write the R script that does the actual work, it needs to grab input file and output file, read data from the input file and write data to the output file. Something like that :
#!/usr/bin/env Rscript

# grab arguments
argv <- commandArgs( TRUE )
datafile <- argv[1]
outfile  <- argv[2] 

# read data from data file 
rl <- readLines( datafile )
extract <- function( index = 1 ){
  rx <- sprintf( "^(I%d *= *)(.*)$", index )
  as.numeric( gsub( rx, "\\2", grep(rx, rl, value = TRUE ) ) ) 
}
x1 <- extract( 1 )
x2 <- extract( 2 )
x3 <- extract( 3 )

out <- x1 + x2 + x3
cat( "O1 = ", out, sep = "", file = outfile )

Next, we need to modify the Makefile.am file so that the make install step copies the rwrapper.R file into the wrappers/bin directory later.
ACLOCAL_AMFLAGS = -I m4

wrapperdir          = $(prefix)/wrappers

wrapper_LTLIBRARIES = rwrapper.la
wcode_la_SOURCES    = wrapper.c
wcode_la_CPPFLAGS   = $(OPENTURNS_WRAPPER_CPPFLAGS)
wcode_la_LDFLAGS    = -module -no-undefined -version-info 0:0:0
wcode_la_LDFLAGS   += $(OPENTURNS_WRAPPER_LDFLAGS)
wcode_la_LIBADD     = $(OPENTURNS_WRAPPER_LIBS)

XMLWRAPPERFILE      = rwrapper.xml
wrapper_DATA        = $(XMLWRAPPERFILE)
EXTRA_DIST          = $(XMLWRAPPERFILE).in test.py code_C1.data

execbindir          = $(prefix)/bin
execbin_DATA        = rwrapper.R
Then, we need to make a few changes to the rwrapper.xml.in file. Here is the definition of the output variable:
        <variable id="O1" type="out">
          <comment>Output 1</comment>
          <unit>none</unit>
          <regexp>O1\S*=\S*(\R)</regexp>
        </variable>

You also need to add the subst tag in the output file definition (at least with this version of openturns) :
      <!-- An output file -->
      <file id="result" type="out">
        <name>The output result file</name>
        <path>code_C1.result</path>
        <subst>O1</subst>
      </file>
 
and then change the command that invokes the script as follows:
    <command>Rscript @prefix@/bin/rwrapper.R code_C1.data code_C1.result</command>

Download the full rwrapper.xml.in file Once this is done (you can grab a tar.gz of the wrapper at that stage) , you can compile the wrapper by following these steps:
$ ./bootstrap
$ ./configure --prefix=/home/romain/openturns --with-openturns=/usr/local
$ make 
$ make install
If all goes well, you should have a rwrapper.R file in the ~/openturns/bin directory and a file rwrapper.xml in the ~/openturns/wrappers directory
Before trying the wrapper, we need to copy the input file in the directory where we are going to run openturns (say /tmp)
$ cp code_C1.data /tmp
$ cd /tmp
Now we are good to go and can start using the wrapper from open turns:
$ python
>>> from openturns import *
>>> p = NumericalPoint( (1,2,3))
>>> f = NumericalMathFunction( "rwrapper" )
>>> print f(p )
class=NumericalPoint name=Unnamed dimension=1 implementation=class=NumericalPointImplementation name=Unnamed dimension=1 values=[6]
>>> 1+2+3
6
The drawback of this approach is that each time the function needs to be evaluated, a new R session will be launched by Rscript, depending on the number of iterations we want to do this can affect seriously the run time of the study. A way to get around this is to use a single R session and let the wrapper communicate with it. I can see at least two ways to do it:
  • by writing the function in python and let python communicate with R (using rpy for instance)
  • by writing a c wrapper that would initialize a connection to an R server when the function is created, and call it whenever the function needs to be called
I'll try to tell these stories in another post

Wednesday, January 21 2009

python code in sweave document

It would be great if we could not only use R or S in sweave code chunks but also some other languages such as python for example. Why would you want that, well python has some additional graphics capabilities R does not have, some software is written in python but you still want to write your document in sweave, ... Here is a first attempt, obviously not complete.

A custom sweave driver

The first trick is to write a custom sweave driver, based on the basic RweaveLatex driver which does something with the content of a chunk when the engine is set to python :

driver <- RweaveLatex() 
runcode <- driver$runcode
driver$runcode <- function(object, chunk, options){
if( options$engine == "python" ){
driver$writedoc( object, c("\\begin{python}", chunk, "\\end{python}") )
} else{
runcode( object, chunk, options )
}
}
Sweave( "python.Rnw", driver = driver )
The only thing the driver does is convert python code chunks into a python environment, so that this in the Rnw file:
<<hello,engine=python>>=
print "hello"
print "world"
@
becomes that in the tex file:
\begin{python}
print "hello"
print "world"
\end{python}

Process the python code


Then you need to install the python package into your texmf tree and texhash (just google around if you don't know what it means). The python package defines the python environment so that when you compile the tex file, latex calls python and brings back the output of the python script. The catch is that you need to compile your tex file with the option -shell-escape.
$ pdflatex -shell-escape python.tex

Beyond the simple trick


So we can get hello world from python, this needs more thinking to enable:
  • production of graphics from python with a fig option, just like you do it in R, see this for example
  • some way to share the data between R and python so that variables created in the R world could be used in the python world and vice-versa, I don't know the best way to do that at the moment, but from the  top of my head we could either use rpy for the communication or the database that gets generated by the cacheSweave package

Monday, January 12 2009

R code completion in sweave chunks

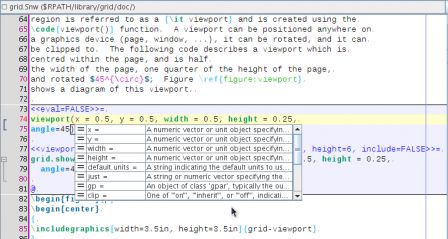
In this post I said that it would be useful to add completion of R code within a sweave chunk, and today I finally found the time to play with it.

Completion of R code within a Sweave chunk

You need revision 195 at least to get this going.

Friday, January 9 2009

Code Completion for R scripts

Standard Completion

The power editor supports completion of R code by relying on the CompletePlus function in the svMisc package. This function uses the completion engine that comes with R (formerly implemented in the rcompgen package and incorporated in utils in recent versions of R), and looks in documentation files for additional information related to each finding, for example when completing "rnorm( ", the CompletePlus function looks into the help page for rnorm and retrieves the description of each of the arguments :

R> require( svMisc )
Loading required package: svMisc
R> CompletePlus( "rnorm(" )
[,1] [,2]
[1,] "n = " "rnorm"
[2,] "mean = " "rnorm"
[3,] "sd = " "rnorm"
[,3]
[1,] "number of observations. If 'length(n) > 1', the length is taken to be the number required."
[2,] "vector of means."
[3,] "vector of standard deviations."

The power editor plugin uses this information to display completion popups:

Completion of Colors

In special cases, instead of argument or function names, the engine will complete for colours using the current R palette :

or names of colors if you started to type a quote character

here the user started to type gre so the completion engine looks for colors having a name that matches the pattern gre. This is basically obtained as follows:

> head( grep( "gre", colors(), value = T ) )
[1] "darkgreen" "darkgrey" "darkolivegreen" "darkolivegreen1"
[5] "darkolivegreen2" "darkolivegreen3"

Line Type completion

Usually the lty argument is associated with a line type, the completion engine suggests the basic line types as documented in ?par

Plot Character Completion

Same with the pch argument and the plotting character.

Wednesday, December 31 2008

Edit Sweave files with the workbench

Edit Sweave Files with the Workbench

Sweave is a very useful combination of LaTeX and R together in one document. You can find more information about sweave by visiting its homepage or by simply typing ?Sweave at your R command line.
This post demonstrates some of the features of the Power Editor plugin for the biocep workbench when editing Sweave files, we will see other features in subsequent posts.

The LaTeXTools plugin for jedit gave a good starting point for Sweave integration as most of the parsing of LaTeX syntax is directly borrowed from it, however the plugin could not directly cope with the mixture of latex and R in the same document, so there is a small bit of coding around it to get things working. Also the sidekick tree for latex gives a too restrictive set of icons for the sections of the file, so some coding was needed to get a nice R icon to represent a sweave code chunk.

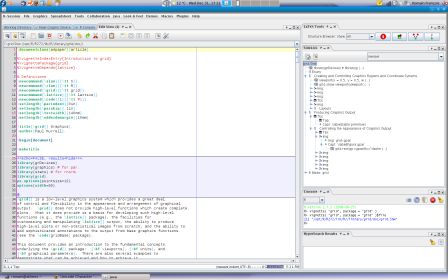
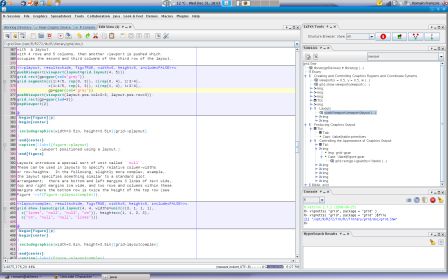
Here is a screenshot of the workbench when editing a sweave file, this example is the grid vignette, which you may find by typing :
R> vignette( "grid", package = "grid")$file

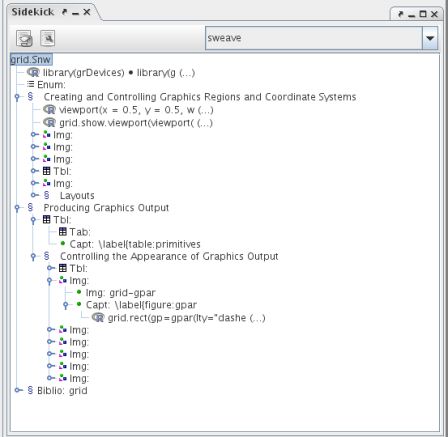
You can see the sidekick view on the right showing a browsable outline of the document. The editor and the sidekick view are synchronized so when you click on a node of the tree, the editor will scroll to the appropriate location and when you move to some other part of the document, the tree will update to show the location being edited.


The Power Editor plugin also allows to visually identify documentation and code parts of the document as you can see in the following screenshot where Sweave code chunks are being highlighted with a light blue background.


Requirements

To get the features documented here, you need both updated versions of biocep and the Power Editor Plugin (at least revision 194). I will do an other post about how to install these things.
You also need R and Sweave mode files (I still need to find a way to embed them in the plugin) saved in your jedit settings directory with the following lines in your catalog file :

<MODE NAME="R"    FILE="r.xml" 
FILE_NAME_GLOB="*.R"
FIRST_LINE_GLOB="#!/*{R,Rscript}" />
<MODE NAME="sweave"   
FILE="sweave.xml"
FILE_NAME_GLOB="*.{R,S}nw" />

Coming Next

It would be nice to :
  • allow preview of graphics when fig=TRUE is set, I need to understand some of the packages providing cache feature for Sweave
  • have R completion when inside the code chunk , see this post
  • completion of the options used by the sweave driver
  • actions to weave and tangle the current file
  • jump between sweave code chunks
  • integrate this as a view
  • support the html flavour of sweave

page 5 of 5 -