

To content | To menu | To search
Monday, February 2 2009
By romain francois on Monday, February 2 2009, 23:48
By romain francois on Monday, February 2 2009, 22:56

By romain francois on Monday, February 2 2009, 20:39

By romain francois on Monday, February 2 2009, 08:43
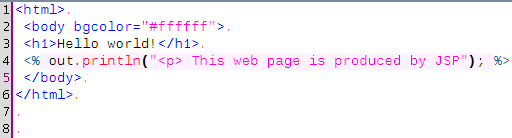
jedit usually makes a good job of editing files with various languages in it, for example jsp files contain some java code, sweave files contain some R code, brew templates contain R code, R code might contain XML code (if you use the R4X package, but we'll get to this one some other time). Unfortunately, because jedit uses the same color styles for all languages, you don't get so much of a visual aid to tell you that you switched languages, enters Nested
Nested is a simple jedit plugin that paints the background of a code chunk differently if this code is not coming from the same mode as the mode of the buffer, and the color is left to the user's choice. Here is an example with some java code within a JSP file, the pink background around the java statement comes from the Nested plugin.
The colours are controlled by a file residing on the plugin directory that looks like this :
html,css,#eeeeee
jaxx,java,#ccff99
jaxx,xml,#ffffff
jsp,java,#fff2ff
but you can also use the Nested dockable window to control things

Java code will appear in pink inside a jsp file, java code will appear green inside jaxx files, ... and you can click on the colour if you want to change it to something else
When you open a file that contains sub-languages, an entry will automatically be inserted in the settings if it does not exist yet, in that case, the colour used is the same as the background color of the view, so that by default nothing changes.
Friday, January 30 2009
By romain francois on Friday, January 30 2009, 16:28
script tags as java code and code inside style tags as CSS. It would need a bit of work to deal with data binding and the special jaxx css, but it's a start.
<?xml version="1.0"?>
<!DOCTYPE MODE SYSTEM "xmode.dtd">
<MODE>
<RULES IGNORE_CASE="FALSE">
<SPAN_REGEXP MATCH_TYPE="MARKUP"
DELEGATE="java::MAIN" HASH_CHAR="<">
<BEGIN><script></BEGIN>
<END></script></END>
</SPAN_REGEXP>
<SPAN_REGEXP MATCH_TYPE="MARKUP"
DELEGATE="css::MAIN" HASH_CHAR="<">
<BEGIN><style></BEGIN>
<END></style></END>
</SPAN_REGEXP>
<IMPORT DELEGATE="xml::MAIN" />
</RULES>
</MODE>
Don't forget to add this line to you catalog file:
<MODE NAME="jaxx" FILE="jaxx.xml" FILE_NAME_GLOB="*.jaxx" />
By romain francois on Friday, January 30 2009, 10:38
 I has been a while since I last uploaded a graph in there, mainly because the process of adding a new graph is taking some time and is not that much automated. Many people have sent me suggestion graphics and eventually I will add them ... I promise.
I have the intention of reworking the website so that it will be easier to maintain and other people can get involved, for that I will start by clean the php code behind it and release it into r-forge. For example, I'd like the process of adding a graph to be a bit more community driven instead of just being me selection graph that look good. watch this space.
I has been a while since I last uploaded a graph in there, mainly because the process of adding a new graph is taking some time and is not that much automated. Many people have sent me suggestion graphics and eventually I will add them ... I promise.
I have the intention of reworking the website so that it will be easier to maintain and other people can get involved, for that I will start by clean the php code behind it and release it into r-forge. For example, I'd like the process of adding a graph to be a bit more community driven instead of just being me selection graph that look good. watch this space.Friday, January 23 2009
By romain francois on Friday, January 23 2009, 12:06
wrapper_calling_shell_command available with openturns and somewhat inspired from the scilab example. Wrappers allow you to call an external program as the function through which you propagate uncertainty with openturns, so that you can write you function in the language you are familiar with (R here) but still take advantage of open turns. This was done in fedora with R and open turns installed (see this post for how to install open turns on a fedora 10 machine).
$ mkdir ~/opwrappers
$ cp -fr /usr/local/share/openturns/WrapperTemplates/wrapper_calling_shell_command ~/opwrappers/rwrapper
$ cd ~/opwrappers/rwrapper/
$ ll
total 300
-rw-r--r-- 1 romain romain     27 2009-01-23 11:54 AUTHORS
-rwxr-xr-x 1 romain romain   1304 2009-01-23 11:54 bootstrap
-rw-r--r-- 1 romain romain 199260 2009-01-23 11:54 ChangeLog
-rw-r--r-- 1 romain romain    216 2009-01-23 11:54 code_C1.data
-rw-rw-r-- 1 romain romain   1594 2009-01-23 12:42 configure.ac
-rw-r--r-- 1 romain romain  18002 2009-01-23 11:54 COPYING
-rwxr-xr-x 1 romain romain   1794 2009-01-23 11:54 customize
-rw-r--r-- 1 romain romain   9498 2009-01-23 11:54 INSTALL
drwxr-xr-x 2 romain romain   4096 2009-01-23 11:54 m4
-rw-rw-r-- 1 romain romain    571 2009-01-23 12:42 Makefile.am
-rw-r--r-- 1 romain romain    447 2009-01-23 11:54 myCFunction.c
-rw-r--r-- 1 romain romain    455 2009-01-23 11:54 myCFunction.h
-rw-r--r-- 1 romain romain      0 2009-01-23 11:54 NEWS
-rw-r--r-- 1 romain romain    925 2009-01-23 11:54 README
-rwxrwxr-x 1 romain romain    435 2009-01-23 12:03 rwrapper.R
-rw-rw-r-- 1 romain romain   3722 2009-01-23 12:42 rwrapper.xml.in
-rw-rw-r-- 1 romain romain   1442 2009-01-23 12:42 test.py
-rw-rw-r-- 1 romain romain   9349 2009-01-23 12:42 wrapper.c
-rw-r--r-- 1 romain romain     27 2009-01-23 11:54 AUTHORS
The first thing to do is to
customize the wrapper so that it is called rwrapper instead of the default wcode. This is achieved by the customize script:
$ ./customize rwrapperThe files
myCFunction.* are useless and you can remove them at that point, we won't need the code_C1.c file either since we are going to write an R script instead.
$ rm myCFunction.*
$ rm code_C1.c
$ ll
total 288
-rw-r--r-- 1 romain romain     27 2009-01-23 11:54 AUTHORS
-rwxr-xr-x 1 romain romain   1304 2009-01-23 11:54 bootstrap
-rw-r--r-- 1 romain romain 199260 2009-01-23 11:54 ChangeLog
-rw-r--r-- 1 romain romain    216 2009-01-23 11:54 code_C1.data
-rw-rw-r-- 1 romain romain   1594 2009-01-23 12:42 configure.ac
-rw-r--r-- 1 romain romain  18002 2009-01-23 11:54 COPYING
-rwxr-xr-x 1 romain romain   1794 2009-01-23 11:54 customize
-rw-r--r-- 1 romain romain   9498 2009-01-23 11:54 INSTALL
drwxr-xr-x 2 romain romain   4096 2009-01-23 11:54 m4
-rw-rw-r-- 1 romain romain    571 2009-01-23 12:42 Makefile.am
-rw-r--r-- 1 romain romain      0 2009-01-23 11:54 NEWS
-rw-r--r-- 1 romain romain    925 2009-01-23 11:54 README
-rwxrwxr-x 1 romain romain    435 2009-01-23 12:03 rwrapper.R
-rw-rw-r-- 1 romain romain   3722 2009-01-23 12:42 rwrapper.xml.in
-rw-rw-r-- 1 romain romain   1442 2009-01-23 12:42 test.py
-rw-rw-r-- 1 romain romain   9349 2009-01-23 12:42 wrapper.c
Next, we need to write the R script that does the actual work, it needs to grab input file and output file, read data from the input file and write data to the output file. Something like that :
#!/usr/bin/env Rscript

# grab arguments
argv <- commandArgs( TRUE )
datafile <- argv[1]
outfile  <- argv[2]

# read data from data file
rl <- readLines( datafile )
extract <- function( index = 1 ){
  rx <- sprintf( "^(I%d *= *)(.*)$", index )
  as.numeric( gsub( rx, "\\2", grep(rx, rl, value = TRUE ) ) )
}
x1 <- extract( 1 )
x2 <- extract( 2 )
x3 <- extract( 3 )

out <- x1 + x2 + x3
cat( "O1 = ", out, sep = "", file = outfile )
Next, we need to modify the Makefile.am file so that the make install step copies the rwrapper.R file into the wrappers/bin directory later.
ACLOCAL_AMFLAGS = -I m4

wrapperdir          = $(prefix)/wrappers

wrapper_LTLIBRARIES = rwrapper.la
wcode_la_SOURCES    = wrapper.c
wcode_la_CPPFLAGS   = $(OPENTURNS_WRAPPER_CPPFLAGS)
wcode_la_LDFLAGS    = -module -no-undefined -version-info 0:0:0
wcode_la_LDFLAGS   += $(OPENTURNS_WRAPPER_LDFLAGS)
wcode_la_LIBADD     = $(OPENTURNS_WRAPPER_LIBS)

XMLWRAPPERFILE      = rwrapper.xml
wrapper_DATA        = $(XMLWRAPPERFILE)
EXTRA_DIST          = $(XMLWRAPPERFILE).in test.py code_C1.data

execbindir          = $(prefix)/bin
execbin_DATA        = rwrapper.R
Then, we need to make a few changes to the
rwrapper.xml.in file. Here is the definition of the output variable:
        <variable id="O1" type="out">
          <comment>Output 1</comment>
          <unit>none</unit>
          <regexp>O1\S*=\S*(\R)</regexp>
        </variable>
You also need to add the subst tag in the output file definition (at least with this version of openturns) :
      <!-- An output file -->
      <file id="result" type="out">
        <name>The output result file</name>
        <path>code_C1.result</path>
        <subst>O1</subst>
      </file>
and then change the command that invokes the script as follows:
<command>Rscript @prefix@/bin/rwrapper.R code_C1.data code_C1.result</command>Download the full rwrapper.xml.in file Once this is done (you can grab a tar.gz of the wrapper at that stage) , you can compile the wrapper by following these steps:
$ ./bootstrap
$ ./configure --prefix=/home/romain/openturns --with-openturns=/usr/local
$ make
$ make install
If all goes well, you should have a
rwrapper.R file in the ~/openturns/bin directory and a file rwrapper.xml in the ~/openturns/wrappers directory
/tmp)
$ cp code_C1.data /tmp
$ cd /tmp
Now we are good to go and can start using the wrapper from open turns:
$ python
>>> from openturns import *
>>> p = NumericalPoint( (1,2,3))
>>> f = NumericalMathFunction( "rwrapper" )
>>> print f(p )
class=NumericalPoint name=Unnamed dimension=1 implementation=class=NumericalPointImplementation name=Unnamed dimension=1 values=[6]
>>> 1+2+3
6
The drawback of this approach is that each time the function needs to be evaluated, a new R session will be launched by Rscript, depending on the number of iterations we want to do this can affect seriously the run time of the study. A way to get around this is to use a single R session and let the wrapper communicate with it. I can see at least two ways to do it:
By romain francois on Friday, January 23 2009, 10:11
Thursday, January 22 2009
By romain francois on Thursday, January 22 2009, 11:04
s/html/latex/g to support latex output (I realize this is not the best option and I should probably abstract things out so that it would be easier to add new formats: ansi, svg, ...) but it does the trick for now.
Here is a screenshot of an example file edited in jedit:
 And a screenshot of the pdf file
 Here are the relevant files if you want to try it out:
Wednesday, January 21 2009
By romain francois on Wednesday, January 21 2009, 12:14
driver <- RweaveLatex()The only thing the driver does is convert python code chunks into a python environment, so that this in the Rnw file:
runcode <- driver$runcode
driver$runcode <- function(object, chunk, options){
if( options$engine == "python" ){
driver$writedoc( object, c("\\begin{python}", chunk, "\\end{python}") )
} else{
runcode( object, chunk, options )
}
}
Sweave( "python.Rnw", driver = driver )
<<hello,engine=python>>=becomes that in the tex file:
print "hello"
print "world"
@
\begin{python}
print "hello"
print "world"
\end{python}-shell-escape. $ pdflatex -shell-escape python.tex
Monday, January 19 2009
By romain francois on Monday, January 19 2009, 16:00
After spending quite some time to install openturns on my fedora box, I feel I should post about it to spare the time of other people. The install page advertises for a forthcoming support for RPM packages available soon (we all know the real definition of soon don't we : it means "we don't need it for ourselves, so if you want it, do it", which is fair enough).
If I had more time, I would learn how to make rpms, and provide one for openturns, but this does not seem necessary for now as openturns installs fine from source, at least if you go round a few things. This post is absolutely not a replacement for the real install notes but maybe guidelines on how to read these notes from a fedora perspective.
Grab the tar.gz from sourceforge and unzip it somewhere.
This is what the install notes say :
Till 0.12.1 included:
* GCC C, C++ and Fortran compilers (>= 3.3.5 except 4.0.x series, tested with 3.4.5, 3.4.6, 4.1.1, 4.1.2 & 4.2.2) * Python interpreter (>= 2.4.x) * R statistical language (>= 2.0) * Xerces-C XML parser (>= 2.6.0, tested with 2.7.0) * BOOST C++ library (>= 1.33.1) * LAPACK Linear Algebra library (>= 3.0) * Qt (3.3.x) * python-qt if you want to use the embedded image viewer ViewImage (TUI only)
Since 0.12.2:
* GCC C, C++ and Fortran compilers (>= 3.3.5 except 4.0.x series, tested with 3.3.5, 3.3.6, 3.4.5, 3.4.6, 4.1.1, 4.1.2, 4.2.2 & 4.3.1) * Python interpreter (>= 2.4.x) * R statistical language (>= 2.0) * Libxml2 XML library (>= 2.6.27) * LAPACK Linear Algebra library (>= 3.0) * python-qt if you want to use the embedded image viewer ViewImage (TUI only)
Here is what I have done on my fedora machine: python and gcc are already installed unless you really want them not to be, so nothing to do here, R is easy to compile from source, but you can get it with yum as well (yum install R)
For the other software, here is my list of yum calls :
# yum install -y xerces-c-devel
# yum install -y boost-devel
# yum install -y lapack-devel
# yum install -y qt3-devel
# yum install -y PyQt-devel
# yum install -y libxml2-devel
I also installed rpy and graphviz to have optional features as well:
# yum install -y rpy
# yum install -y graphviz-devel
After that, the ./configure call should be ok. Here is the summary I got which sounds good enough.
Now you can install the R package rotRPackage which comes with openturns as described in the install page
# R CMD INSTALL utils/rotRPackage_1.4.4.tar.gz
You also need the sensitivity package, but at the time of writing the sensitivity package changed some of its API and openturns did not propagate, so you have to install version 1.3-1 as opposed to the current version.
The other problem I ran into was that I am using a custom ~/.Rprofile file which contains startup instructions such as requireing R packages, this caused the test cases of openturns to fail because the expected output was mixed with the standard error stream (which is where require writes its messages). So at least for running openturns tests, I have modified my .Rprofile file so that it does not load packages or write anything to the standard error stream.
When this is ready, you can do :
$ make   # good opportunity to make some coffee while it compiles
$ make check # everything should be ok
# make install
$ make installcheck # should be ok too
Reading the FAQ is a good way to save yourself some time, specifically when trying to load the openturns python module. I have added these two lines to my .bash_profile file :
PYTHONPATH=/usr/local/lib/python2.5/site-packages/openturns
export PYTHONPATH
Then, you can start python and start using openturns, which is another story ...
$ python
Python 2.5.2 (r252:60911, Sep 30 2008, 15:41:38)
[GCC 4.3.2 20080917 (Red Hat 4.3.2-4)] on linux2
Type "help", "copyright", "credits" or "license" for more information.
>>> from openturns import *
Sunday, January 18 2009
By romain francois on Sunday, January 18 2009, 20:00
A few coding hours in the train later, I've added new features to the structure matcher for R scripts. Basically I've been working to improve the matching of closing curly brackets in particular cases. This is how it proceeds: when you close a curly bracket, it looks for the corresponding opening bracket (thanks to the TextUtilities class), then looks if there is a closing round bracket just before, finds the matching opening round bracket, identifies which word is before. Then
... but it is probably better to show some screenshots to get a better idea:


Wednesday, January 14 2009
By romain francois on Wednesday, January 14 2009, 11:40
It is often useful when you close a bracket to know which bracket is the corresponding opening bracket, for this jedit has the StructureMatcher interface and the default implementation gives you this information, by surrounding the opening bracket when you type its associated closing bracket.
On the other hand, the XML plugin gives you a more useful information when closing an XML tag. Let's see it in action with this simple XML file from the w3c

On the left, the caret is within the </note> closing tag and so the entire opening <note> tag is being highlighted. Similarly, on the right, the caret is within the opening <heading> tag and consequently the closing </heading> gets highlighted. This is particularly useful when editing xml documents.
So the idea was to have the same sort of behaviour for R scripts. Here's a start, but I also plan to do something with the curly brackets to deal with for loops, function definitions and various apply calls, ... (see that post)


Monday, January 12 2009
By romain francois on Monday, January 12 2009, 21:25
In this post I said that it would be useful to add completion of R code within a sweave chunk, and today I finally found the time to play with it.

You need revision 195 at least to get this going.
Friday, January 9 2009
By romain francois on Friday, January 9 2009, 15:31
The power editor supports completion of R code by relying on the CompletePlus function in the svMisc package. This function uses the completion engine that comes with R (formerly implemented in the rcompgen package and incorporated in utils in recent versions of R), and looks in documentation files for additional information related to each finding, for example when completing "rnorm( ", the CompletePlus function looks into the help page for rnorm and retrieves the description of each of the arguments :
R> require( svMisc )
Loading required package: svMisc
R> CompletePlus( "rnorm(" )
     [,1]      [,2]
[1,] "n = "    "rnorm"
[2,] "mean = " "rnorm"
[3,] "sd = "   "rnorm"
     [,3]
[1,] "number of observations. If 'length(n) > 1', the length is taken to be the number required."
[2,] "vector of means."
[3,] "vector of standard deviations."
The power editor plugin uses this information to display completion popups:


In special cases, instead of argument or function names, the engine will complete for colours using the current R palette :

or names of colors if you started to type a quote character

here the user started to type gre so the completion engine looks for colors having a name that matches the pattern gre. This is basically obtained as follows:
> head( grep( "gre", colors(), value = T ) )
[1] "darkgreen"       "darkgrey"        "darkolivegreen"  "darkolivegreen1"
[5] "darkolivegreen2" "darkolivegreen3"
Usually the lty argument is associated with a line type, the completion engine suggests the basic line types as documented in ?par

Same with the pch argument and the plotting character.

Monday, January 5 2009
By romain francois on Monday, January 5 2009, 15:58
$ svn checkout svn://svn.r-forge.r-project.org/svnroot/biocepFor this to work you need java (>= 1.5) and ant installed. This should create a file biocep.jar that you can copy wherever you like. On my linux machine, I usually put a copy at "/opt/biocep/biocep.jar"
$ cd biocep
$ ant distrib
install.packages("svTools",repos="http://R-Forge.R-project.org")install.packages("operators",repos="http://R-Forge.R-project.org")install.packages("svMisc",repos="http://R-Forge.R-project.org")$ svn checkout svn://svn.r-forge.r-project.org/svnroot/biocep-editorOnce the project is retrieved, you need to edit the file build.properties.sample and rename it build.properties.
$ cd biocep-editor
$ ant installDependent
ant installStandalone

Wednesday, December 31 2008
By romain francois on Wednesday, December 31 2008, 17:32
R> vignette( "grid", package = "grid")$file


<MODE NAME="R"    FILE="r.xml"
  FILE_NAME_GLOB="*.R"
  FIRST_LINE_GLOB="#!/*{R,Rscript}" />
<MODE NAME="sweave"
  FILE="sweave.xml"
  FILE_NAME_GLOB="*.{R,S}nw" />
fig=TRUE is set, I need to understand some of the packages providing cache feature for Sweavepage 7 of 7 - next entries »